填坑:spring-data-redis(Jedis)

问题: Cloud not get resource from pool

图片1:异常

原因

1.使用的组件
pom.xml

1
2
3
4
5
6
7
8
9
10
11
12
13
<!-- https://mvnrepository.com/artifact/redis.clients/jedis -->
<dependency>
<groupId>redis.clients</groupId>
<artifactId>jedis</artifactId>
<version>2.9.0</version>
</dependency>
<!-- https://mvnrepository.com/artifact/org.springframework.data/spring-data-redis -->
<dependency>
<groupId>org.springframework.data</groupId>
<artifactId>spring-data-redis</artifactId>
<version>1.8.3.RELEASE</version><!--$NO-MVN-MAN-VER$-->
</dependency>

2.配置

开启事务配置,使用过程,方法上未使用@Transactional的注解。

1
2
3
4
5
6
7
8
9
10
11
12
13
14
15
16
17
18
19
20
21
22
23
24
25
26
//开启事务配置
<property name="enableTransactionSupport" value="true"></property>
......
<!--redis操作模版,使用该对象可以操作redis -->
<bean id="redisTemplate" class="org.springframework.data.redis.core.RedisTemplate" >
<property name="connectionFactory" ref="redisConnectionFactorySentinel" />
<!--如果不配置Serializer,那么存储的时候缺省使用String,如果用User类型存储,那么会提示错误User can't cast to String!! -->
<property name="keySerializer" >
<bean class="org.springframework.data.redis.serializer.StringRedisSerializer" />
</property>
<property name="valueSerializer" >
<bean class="org.springframework.data.redis.serializer.StringRedisSerializer" />
</property>
<property name="hashKeySerializer">
<bean class="org.springframework.data.redis.serializer.StringRedisSerializer"/>
</property>
<property name="hashValueSerializer">
<bean class="org.springframework.data.redis.serializer.StringRedisSerializer"/>
</property>
<!--开启事务 -->
<property name="enableTransactionSupport" value="true"></property>
</bean>
......

3.分析代码

1
2
3
4
5
6
7
8
9
10
11
12
13
14
15
16
17
18
19
20
21
22
23
24
25
26
27
28
29
30
31
32
33
34
35
36
37
38
39
40
41
42
43
44
45
46
47
48
49
50
51
52
53
54
55
56
57
58
59
60
61
62
63
64
65
66
67
68
69
70
71
72
73
74
75
76
77
78
79
80
81
82
83
84
85
//代码实现
@Component
public class RedisUtil {
@Autowired
private RedisTemplate<String, Object> redisTemplate;
/**
* 普通缓存获取
* @param key 键
* @return
*/
public Object get(String key){
return key==null?null:redisTemplate.opsForValue().get(key);
}
......
//跟踪源码
org.springframework.data.redis.core.RedisTemplate
public <T> T execute(RedisCallback<T> action, boolean exposeConnection, boolean pipeline) {
Assert.isTrue(this.initialized, "template not initialized; call afterPropertiesSet() before using it");
Assert.notNull(action, "Callback object must not be null");
RedisConnectionFactory factory = this.getConnectionFactory();
RedisConnection conn = null;
Object var11;
try {
if (this.enableTransactionSupport) {// 开启事务,此值为:true
conn = RedisConnectionUtils.bindConnection(factory, this.enableTransactionSupport);
} else {
conn = RedisConnectionUtils.getConnection(factory);
}
boolean existingConnection = TransactionSynchronizationManager.hasResource(factory);
RedisConnection connToUse = this.preProcessConnection(conn, existingConnection);
boolean pipelineStatus = connToUse.isPipelined();
if (pipeline && !pipelineStatus) {
connToUse.openPipeline();
}
RedisConnection connToExpose = exposeConnection ? connToUse : this.createRedisConnectionProxy(connToUse);
T result = action.doInRedis(connToExpose);
if (pipeline && !pipelineStatus) {
connToUse.closePipeline();
}
var11 = this.postProcessResult(result, connToUse, existingConnection);
} finally {
RedisConnectionUtils.releaseConnection(conn, factory);//调用释放连接的方法
}
return var11;
}
.....
//跟踪释放连接的代码
//事务开启 connHolder 不为null,get方法没有注解@Transactional,connHolder.isTransactionSyncronisationActive()方法返回false
//事务开启 isConnectionTransactional(conn, factory)为true,没有配置 @Transactional(readOnly = true),TransactionSynchronizationManager.isCurrentTransactionReadOnly()为false
//经过层层判断,未进入任何一个if方法块中,也没调用任何回收redis连接的方法
public static void releaseConnection(RedisConnection conn, RedisConnectionFactory factory) {
if (conn != null) {
RedisConnectionUtils.RedisConnectionHolder connHolder = (RedisConnectionUtils.RedisConnectionHolder)TransactionSynchronizationManager.getResource(factory);//事务开启 connHolder 不为null
if (connHolder != null && connHolder.isTransactionSyncronisationActive()) {//条件不够,不执行
if (log.isDebugEnabled()) {
log.debug("Redis Connection will be closed when transaction finished.");
}
} else {
if (isConnectionTransactional(conn, factory) && TransactionSynchronizationManager.isCurrentTransactionReadOnly()) {//条件不够,不执行
unbindConnection(factory);
} else if (!isConnectionTransactional(conn, factory)) {//条件不够,不执行
if (log.isDebugEnabled()) {
log.debug("Closing Redis Connection");
}
conn.close();
}
}
}
}

综上所述,当spring-data-redis 配置事务的时候,方法使用中不加注解@Transactional,会出现redis连接无法回收,资源池pool 资源耗尽,报异常:Cloud not get resource from pool

解决方法:声明两个RedisTemplate实例

两个RedisTemplate实例?

  • 支持事务:commands要么统一执行,要么都被清除,维护数据完整性;
  • 不支持事务,command立即执行,即时返回执行结果并且更高效;
1
2
3
4
5
6
7
8
9
10
11
12
13
14
15
16
/** Sample Configuration **/
@Configuration
public class RedisTxContextConfiguration {
@Bean
public StringRedisTemplate redisTransactionTemplate() {
StringRedisTemplate template = new StringRedisTemplate(redisConnectionFactory());
// explicitly enable transaction support
template.setEnableTransactionSupport(true);
return template;
}
@Bean
public StringRedisTemplate redisTemplate() {
StringRedisTemplate template = new StringRedisTemplate(redisConnectionFactory());
return template;
}
}

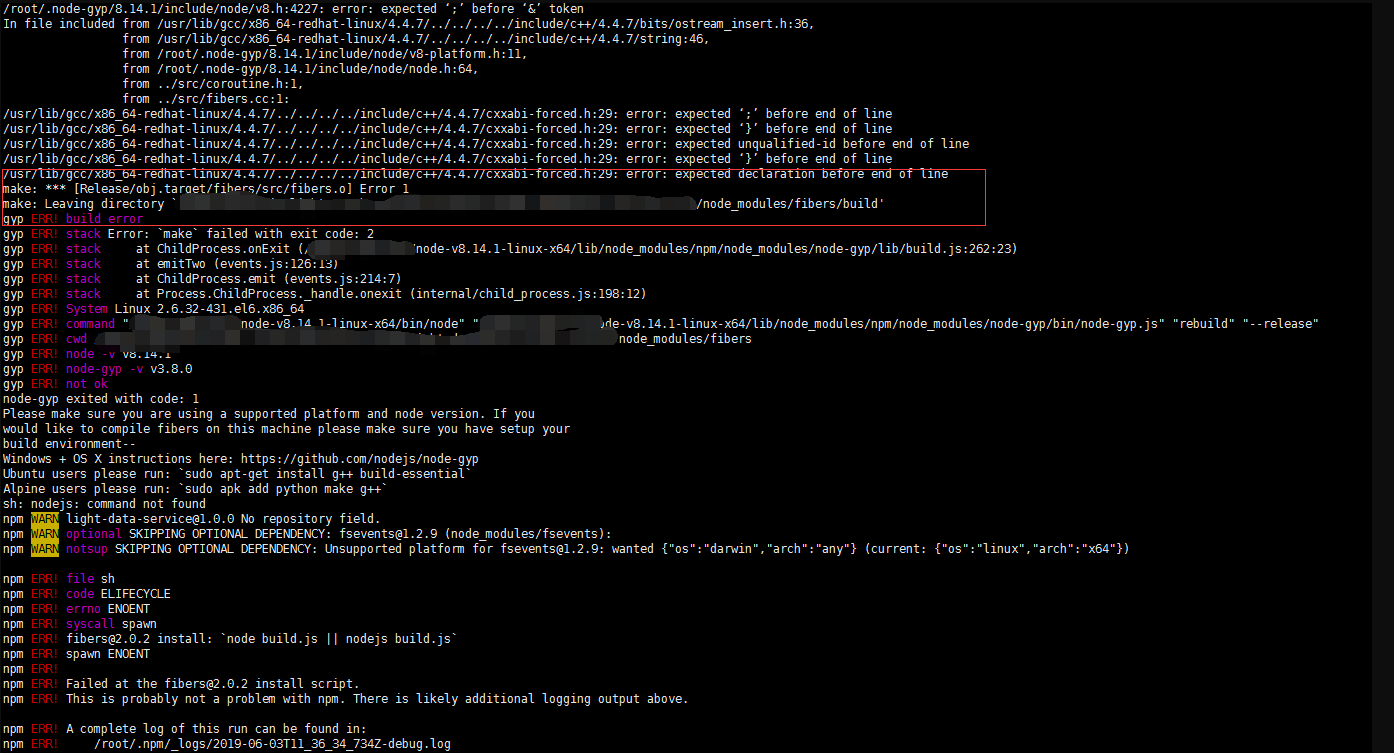
解决issue make: *** [Release/obj.target/fibers/src/fibers.0] Error 1

  1. 问题:在centos6.5的ecs上执行node install命令,报错如下:

make: * [Release/obj.target/fibers/src/fibers.0] Error 1
make: leaving directory
gyp ERR! build error
gyp ERR! Error:make failed with exit code:2

图1.错误堆栈

  1. 解决办法:
  • (1) 安装python2.7
  • (2) gcc升级到4.8
1
2
3
4
wget http://people.centos.org/tru/devtools-2/devtools-2.repo -O /etc/yum.repos.d/devtoolset-2.repo
yum -y install devtoolset-2-gcc devtoolset-2-gcc-c++ devtoolset-2-binutils
scl enable devtoolset-2 bash
echo "source /opt/rh/devtoolset-2/enable" >>/etc/profile
  1. 如何升级gcc参考下方:

《为CentOS 6、7升级gcc至4.8、4.9、5.2、6.3、7.3等高版本》

关于mysql的timestamp类型的使用及问题

       在发布版本的时候,脚本服务程序报出一个异常:java.sql.SQLException: Value ‘0000-00-00 00:00:00’ can not be represented as java.sql.Timestamp。看到这个异常后心里想这是什么鬼呢?在测试环境上跑的好好的程序,发到生产环境就开始搞事情了,真是不让人省心的代码呀。

       快速定位到源程序的出错行,我call,看到的却只是一行用了无数变得SQL查询。查询函数肯定没问题,因为这个查询函数已经被用的烂熟于心了。现在我敢打保票,我们团体的每个伙伴们闭上眼都能写对这个sql的查询函数。

       剩下的就只能怀疑这个超长的SQL查询语句了。赶快把SQL语句格式化一下,细细查看SQL的每个部分:where条件,排序,子查询,连接查询等等。查看完一遍后也没看出端倪。现在只能是怀疑数据库存有脏数据了。 错误异常是关于时间戳转换的问题。那么也就能定位脏数据是出现在查询所涉及的表的timestamp字段中。

       查询出所涉及的数据库表,逐条查看数据库表中的timestamp字段。字段的数据是null或时间数据,感觉没错呀。

       把所有的怀疑都顺了一遍,没发现异常。这下傻了。

       唉,只能是问问搜索引擎君了,往搜索输入框中一甩异常,飞速回车。我的天呢,铺天盖地的搜索结果。这下心里大喜,这个问题是个被大家遇到常见问题。肯定有解决方案。

快速点开搜索结果,开始涨姿势了。。。。。。

请出我们今天的主角——mysql的timetamp类型

1. MySQL的TIMESTAMP类型介绍

  • MySQL的 TIMESTAMP是一种保存日期和时间组合的时间数据类型。

  • TIMESTAMP列的格式为YYYY-MM-DD HH:MM:SS,固定为19个字符。

  • TIMESTAMP值的范围从’1970-01-01 00:00:01’ UTC到’2038-01-19 03:14:07’ UTC。(UTC是零时区标准时间)

  • DATETIM和TIMESTAMP类型所占的存储空间不同,前者8个字节,后者4个字节,这样造成的后果是两者能表示的时间范围不同。前者范围为1000-01-01 00:00:00 ~ 9999-12-31 23:59:59,后者范围为’1970-01-01 00:00:01’ UTC到’2038-01-19 03:14:07’ UTC。所以可以看到TIMESTAMP支持的范围比DATATIME要小,容易出现超出的情况.

  • 当您将TIMESTAMP值插入到表中时,MySQL会将其从连接的时区转换为UTC后进行存储。当您查询TIMESTAMP值时,MySQL会将UTC值转换回连接的时区。请注意,对于其他时间数据类型(如DATETIME),不会进行此转换。当检索由不同时区中的客户端插入TIMESTAMP值时,将获得存储数据库中不同的值。 只要不更改时区,就可以获得与存储的相同的TIMESTAMP值。

timestamp的时区变换是怎么整的?小哥上个示例给大家看看哈

MySQL TIMESTAMP时区示例

1.1. 创建一个名为test_timestamp的新表,该表具有一列:t1,其数据类型为TIMESTAMP;

1
2
3
4
USE mytestdb;
CREATE TABLE IF NOT EXISTS test_timestamp (
t1 TIMESTAMP
);

1.2. 使用SET time_zone语句将时区设置为”+00:00”UTC

1
SET time_zone='+00:00';

1.3. 将TIMESTAMP值插入到test_timestamp表中。

1
2
INSERT INTO test_timestamp
VALUES('2018-09-06 00:00:01');

1.4. 从test_timestamp表中查询选择TIMESTAMP值。

1
2
3
4
5
6
7
8
9
10
11
SELECT
t1
FROM
test_timestamp;
+---------------------+
| t1 |
+---------------------+
| 2018-09-06 00:00:01 |
+---------------------+
1 row in set

1.5. 将会话时区设置为不同的时区,以查看从数据库服务器返回的值:

1
2
3
4
5
6
7
8
9
10
11
12
SET time_zone ='+03:00';
SELECT t1
FROM test_timestamp;
//执行结果
+---------------------+
| t1 |
+---------------------+
| 2018-09-06 03:00:01 |
+---------------------+
1 row in set

2. 将TIMESTAMP列的自动初始化和更新

2.1. 在创建新记录和修改现有记录的时候都对这个数据列刷新:

1
2
TIMESTAMP DEFAULT CURRENT_TIMESTAMP ON UPDATE CURRENT_TIMESTAMP

2.2. 在创建新记录的时候把这个字段设置为当前时间,但以后修改时,不再刷新它:

1
2
TIMESTAMP DEFAULT CURRENT_TIMESTAMP

2.3. 在创建新记录的时候把这个字段设置为0,以后修改时刷新它:

1
2
TIMESTAMP ON UPDATE CURRENT_TIMESTAMP

2.4. 在创建新记录的时候把这个字段设置为给定值,以后修改时刷新它:

1
2
TIMESTAMP DEFAULT ‘yyyy-mm-dd hh:mm:ss' ON UPDATE CURRENT_TIMESTAMP

2.5. 修改timestamp类型的默认属性

1
2
ALTER TABLE `table` MODIFY collumn_1 TIMESTAMP DEFAULT CURRENT_TIMESTAMP NOT NULL;

TIMESTAMP列的自动初始化和更新与mysql的explicit_defaults_for_timestamp参数设置有关:

explicit_defaults_for_timestamp设置为OFF:创建timestamp类型字段是,不设置默认值,则会自带 timestamp NOT NULL DEFAULT CURRENT_TIMESTAMP ON UPDATE CURRENT_TIMESTAMP属性

1
2
3
4
5
6
7
8
9
10
11
12
13
14
15
//自动默认的例子:
mysql> create table test(id int,hiredate timestamp);
Query OK, 0 rows affected (0.01 sec)
//导出建表sql
mysql> show create table test\G
*************************** 1. row ***************************
Table: test
Create Table: CREATE TABLE `test` (
`id` int(11) DEFAULT NULL,
`hiredate` timestamp NOT NULL DEFAULT CURRENT_TIMESTAMP ON UPDATE CURRENT_TIMESTAMP
) ENGINE=InnoDB DEFAULT CHARSET=latin1
1 row in set (0.00 sec)

explicit_defaults_for_timestamp设置为ON:会关闭默认的自动初始与更新属性

如果想在explicit_defaults_for_timestamp设置为OFF时想关闭的自动初始与更新属性,有两种方式

       1> 用DEFAULT子句该该列指定一个默认值

       2> 为该列指定NULL属性。

注意:在MySQL 5.6.5版本之前,Automatic Initialization and Updating只适用于TIMESTAMP,而且一张表中,最多允许一个TIMESTAMP字段采用该特性。从MySQL 5.6.5开始,Automatic Initialization and Updating同时适用于TIMESTAMP和DATETIME,且不限制数量。

3. 时间戳timestamp字段插入0000-00-00 00:00:00

在生产数据库可以给timestamp类型字段插入1970-01-01 08:00:00 (utc+08),然后在测试数据timestamp类型字段插入1970-01-01 08:00:00 (utc+08)时报错Incorrect datetime value: ‘1970-01-01 08:00:00’ for column ‘pause_time’ at row 1。

首先解释一下 1970-01-01 08:00:00(utc+08)日期为东8区的0日期,也就是毫秒的开始时间,对应0时区的日期为 1970-01-01 00:00:00(utc) 在mysq的timestamp称为0000-00-00 00:00:00 也称为0日期。

注意:从5.6.17这个版本就默认设置了不允许插入 0 日期了 术语是 NO_ZERO_IN_DATE NO_ZERO_DATE

如果在5.6.1版本及版本后想插入0日期也是可以的,这需要在mysql的配置文件里修改sql_mode,然后重启服务

1
2
3
4
[mysqld]
#set the SQL mode to strict
#sql-mode="modes..."
sql-mode = "STRICT_TRANS_TABLES,NO_AUTO_CREATE_USER,NO_ENGINE_SUBSTITUTION"

查看sql-mode设置值的命令

1
SHOW VARIABLES LIKE 'sql_mode';

关于mysql的sql_mode可参考文档sql_mode文档

sql_mode常用值

  • ONLY_FULL_GROUP_BY:对于GROUP BY聚合操作,如果在SELECT中的列,没有在GROUP BY中出现,那么这个SQL是不合法的,因为列不在GROUP BY从句中
  • NO_AUTO_VALUE_ON_ZERO:该值影响自增长列的插入。默认设置下,插入0或NULL代表生成下一个自增长值。如果用户 希望插入的值为0,而该列又是自增长的,那么这个选项就有用了。
  • STRICT_TRANS_TABLES:在该模式下,如果一个值不能插入到一个事务表中,则中断当前的操作,对非事务表不做限制
  • NO_ZERO_IN_DATE:在严格模式下,不允许日期和月份为零
  • NO_ZERO_DATE:设置该值,mysql数据库不允许插入零日期,插入零日期会抛出错误而不是警告。
  • ERROR_FOR_DIVISION_BY_ZERO:在INSERT或UPDATE过程中,如果数据被零除,则产生错误而非警告。如 果未给出该模式,那么数据被零除时MySQL返回NULL
  • NO_AUTO_CREATE_USER:禁止GRANT创建密码为空的用户
  • NO_ENGINE_SUBSTITUTION:如果需要的存储引擎被禁用或未编译,那么抛出错误。不设置此值时,用默认的存储引擎替代,并抛出一个异常
  • PIPES_AS_CONCAT:将”||”视为字符串的连接操作符而非或运算符,这和Oracle数据库是一样的,也和字符串的拼接函数Concat相类似
  • ANSI_QUOTES:启用ANSI_QUOTES后,不能用双引号来引用字符串,因为它被解释为识别符

4. 对于我们碰到异常解决方法

java.sql.SQLException: Value ‘0000-00-00 00:00:00’ can not be represented as java.sql.Timestamp

解决方法

  • 在JDBC连接串中有一项属性:zeroDateTimeBehavior,可以用来配置出现这种情况时的处理策略,该属性有下列三个属性值:

       1> exception:默认值,即抛出SQL state [S1009]. Cannot convert value….的异常;

       2> convertToNull:将日期转换成NULL值;

       3> round:替换成最近的日期即0001-01-01;

  • 因此对于这类异常,可以考虑通过修改连接串,附加zeroDateTimeBehavior=convertToNull属性的方式予以规避,例如:
    jdbc:mysql://localhost:3306/mydbname?zeroDateTimeBehavior=convertToNull

  • 另外,这类异常的触发也与timestamp赋值的操作有关,如果能够在设计阶段和记录写入阶段做好逻辑判断,避免写入 ‘0000-00-00 00:00:00’这类值,那么也可以避免出现 Cannot convert value ‘0000-00-00 00:00:00’ from column N to TIMESTAMP的错误。

一个异常背后涉及的的东东还是蛮多的,通过一波涨姿势操作,我们还是解决了我们的问题。现梳理成文,以作参考!

MongoDB索引的创建之道----快速查询的利器

为什么要写这篇文章呢?原因来自于一次生产MongoDB CPU利用率100%问题的排查与解决。事情是这样的:崩溃日志的数据可视化功能上线后打开页面发现页面的数据展现很慢,数据请求需要花费很长时间;同时数据请求使用的MongoDB数据库cpu利用率100%持续报警。经过一系列查找,最终定位是MongoDB数据库慢查询导致的。在解决问题过程中发现,这些慢查询的优化基本上跟Mongodb索引有关。因此,有了这篇关于MongoDB索引使用的文章,同时借此做以总结。

一.什么是索引

索引能支持MongoDB的高效查询。如果没有索引,MongoDB查询时,为了选择、查找查询语句匹配的文档,MongoDB数据库需要执行集合扫描,即,扫描集合中的每一个文档。如果查询建立了合适的索引,MongoDB查询时,Mongodb库可以使用索引,减少扫描文档的数量。也就说,索引是通过减少查询时扫描集合文档的数量来提高查询效率的。

索引是储集合数据集的一小部分,这部存储数据有易于遍历的特性。为了易于遍历,索引是按字段的值排序存储这些字段或一组字段的值的。索引条目的排序支持有效的相等匹配和基于范围的查询操作。此外,MongoDB还可以使用索引中的排序返回排序后的结果。

下图显示了使用索引选择和排序匹配文档的查询:

从根本上说,MongoDB中的索引与其他数据库系统中的索引相似。MongoDB在集合级别定义索引,并支持MongoDB集合中文档的任何字段或子字段的索引

二、索引的管理

1.创建索引

1
db.collection.ensureIndex( keys,[,options] )
  • keys,要建立索引的参数列表。如:{KEY:1},其中key表示字段名,1表示升序排序,也可使用使用数字-1降序。
  • options,可选参数,表示建立索引的设置。可选值如下:
    • background,Boolean,在后台建立索引,以便建立索引时不阻止其他数据库活动。默认值 false。
    • unique,Boolean,创建唯一索引。默认值 false。
    • name,String,指定索引的名称。如果未指定,MongoDB会生成一个索引字段的名称和排序顺序串联。
    • dropDups,Boolean,创建唯一索引时,如果出现重复删除后续出现的相同索引,只保留第一个。
    • sparse,Boolean,对文档中不存在的字段数据不启用索引。默认值是 false。
    • v,index version,索引的版本号。
    • weights,document,索引权重值,数值在 1 到 99,999 之间,表示该索引相对于其他索引字段的得分权重。

注意:1.8版本之前创建索引使用createIndex(),1.8版本之后已移除该方法
2.查询索引

1
2
db.collection.getIndexes()

3.删除索引

1
2
3
4
5
//删除某条索引
db.collection.dropIndex("INDEX-NAME")
//删除所有的索引
db.collection.dropIndexes()

三、索引的创建之道

索引支持查询

1.如果所有查询都使用相同的单键,则创建一个单键索引

1
db.example.ensureIndex( { "a": 1 } )

2.为满足不同键的查询,可以创建复合索引

如果您有时只查询一个键,而有时查询该键与另一个键的组合,那么创建复合索引比创建单键索引更有效。MongoDB将为两个查询使用复合索引。

1
db.example.ensureIndex( { "a": 1, "b": 1 } )

这允许您两个选项。您可以只查询a,还可以查a和b的组合。

此外,多个字段上的一个复合索引可以支持搜索这些字段的“前缀”子集的所有查询

清单3.1 例子如下:

索引

1
{x:1,y:1,z:1}

可以支持下列索引的查询

1
2
{ x: 1 }
{ x: 1, y: 1 }

在某些情况下,前缀索引可能提供更好的查询性能:例如,如果z是一个大数组

{x: 1, y: 1, z: 1}索引还可以支持许多与以下索引相同的查询:

1
{ x: 1, z: 1 }

索引支持查询结果排序

在MongoDB中,排序操作可以通过基于索引中的排序检索文档来获得排序顺序。如果查询规划器无法从索引中获得排序顺序,它将在内存中对结果进行排序。使用索引的排序操作通常比不使用索引的操作具有更好的性能。此外,不使用索引的排序操作在使用32兆内存时会中止。

1.使用单个字段的排序

如果升序索引或降序索引位于单个字段上,则字段上的排序操作可以朝任何方向进行

清单3.2 例子如下:

例如,在字段a上为创建升序索引:

1
db.exampe.ensureIndex( { a: 1 } )

这个索引可以支持a上的升序排序:

1
db.exampe.find().sort( { a: 1 } )

该索引还可以通过反向遍历索引来支持a上的以下降序排序:

1
db.exampe.find().sort( { a: -1 } )
  1. 多个字段的排序

创建一个复合索引以支持对多个字段进行排序。

可以在索引的所有键或子集上指定排序;但是,排序键必须按照索引中出现的顺序列出。例如,索引键模式{a: 1, b: 1}可以支持{a: 1, b: 1}上的排序,但不支持{b: 1, a: 1}上的排序。

对于使用复合索引进行排序的查询 .sort()文档中所有键的指定排序方向必须与索引键模式匹配或与索引键模式相反。例如,一个索引键模式{a: 1, b: -1}可以支持{a: 1, b: -1}和{a: -1, b: 1}上的排序,但不能支持{a: -1, b: -1}或{a: 1, b: 1}上的排序。

  • 排序与索引前缀

如果排序键对应于索引键或索引前缀,MongoDB可以使用索引对查询结果进行排序。复合索引的前缀是由索引键模式开头的一个或多个键组成的子集

清单3.3 例子如下:

1
db.example.ensureIndex( { a:1, b: 1, c: 1, d: 1 } )

则上述索引的前缀为:

1
2
3
{ a: 1 }
{ a: 1, b: 1 }
{ a: 1, b: 1, c: 1 }

下面的查询和排序操作使用索引前缀对结果进行排序。这些操作不需要在内存中对结果集进行排序

例子 索引前缀
db.example.find().sort( { a: 1 } ) { a: 1 }
db.example.find().sort( { a: -1 } ) { a: 1 }
db.example.find().sort( { a: 1, b: 1 } ) { a: 1, b: 1 }
db.example.find().sort( { a: -1, b: -1 } ) { a: 1, b: 1 }
db.example.find().sort( { a: 1, b: 1, c: 1 } ) { a: 1, b: 1, c: 1 }
db.example.find( { a: { $gt: 4 } } ).sort( { a: 1, b: 1 } ) { a: 1, b: 1 }

考虑以下示例,其中索引的前缀键同时出现在查询谓词和排序中:

1
2
db.example.find( { a: { $gt: 4 } } ).sort( { a: 1, b: 1 } )

在这种情况下,MongoDB可以使用索引按照排序指定的顺序检索文档。如示例所示,查询谓词中的索引前缀可以与排序中的前缀不同。

  • 索引的排序和非前缀子集

索引可以支持索引键模式的非前缀子集上的排序操作。为此,查询必须在排序键之前的所有前缀键上包含相等条件。

清单3.4 例子如下:

1
2
//索引
{ a: 1, b: 1, c: 1, d: 1 }

以下操作可以使用索引获得排序顺序:

例子 索引前缀
db.example.find( { a: 5 } ).sort( { b: 1, c: 1 } ) { a: 1 , b: 1, c: 1 }
db.example.find( { b: 3, a: 4 } ).sort( { c: 1 } ) { a: 1, b: 1, c: 1 }
db.example.find( { a: 5, b: { $lt: 3} } ).sort( { b: 1 } ) { a: 1, b: 1 }

如最后一个操作所示,只有排序子集前面的索引字段必须具有查询文档中的相等条件;其他索引字段可以指定其他条件。

如果查询没有在排序规范前面或重叠的索引前缀上指定相等条件,则操作将无法有效地使用索引。例如,以下操作指定了{c: 1}的一类文档,但是查询文档不包含前面索引字段a和b上的相等匹配:

1
2
db.example.find( { a: { $gt: 2 } } ).sort( { c: 1 } )
db.example.find( { c: 5 } ).sort( { c: 1 } )

这些操作不能有效地使用索引{a: 1, b: 1, c: 1, d: 1},甚至不能使用索引检索文档。

三、分析MongoDB的慢请求,优化索引

MongoDB 支持 profiling 功能,将请求的执行情况记录到同DB下的 system.profile 集合里,profiling 有3种模式:

  • 关闭 profiling
  • 针对所有请求开启 profiling,将所有请求的执行都记录到 system.profile 集合
  • 针对慢请求 profiling,将超过一定阈值的请求,记录到system.profile 集合
  • 默认请求下,MongoDB 的 profiling 功能是关闭,生产环境建议开启,慢请求阈值可根据需要定制,如不确定,直接使用默认值100ms。

    关于profiling功能说明,参考文档。默认请求下,MongoDB 的 profiling 功能是关闭,生产环境建议开启,慢请求阈值可根据需要定制,如不确定,直接使用默认值100ms。

1
2
3
operationProfiling:
mode: slowOp
slowOpThresholdMs: 100

基于上述配置,MongoDB 会将超过 100ms 的请求记录到对应DB 的 system.profile 集合里,system.profile 默认是一个最多占用 1MB 空间的 capped collection。

1
2
查看最近3条 慢请求,{$natrual: -1} 代表按插入数序逆序
db.system.profile.find().sort({$natrual: -1}).limit(3)

情况1:全盘扫描

全集合(表)扫描 COLLSCAN,当一个查询(或更新、删除)请求需要全表扫描时,是非常耗CPU资源的,所以当你在 system.profile 集合 或者日志文件发现 COLLSCAN 关键字时,就得注意了,很可能就是这些查询吃掉了你的 CPU 资源;确认一下,如果这种请求比较频繁,最好是针对查询的字段建立索引来优化。

一个查询扫描了多少文档,可查看 system.profile 里的 docsExamined 的值,该值越大,请求CPU开销越大。关键字:COLLSCAN、 docsExamined。

情况2:索引未添加或不合理

一个走索引的查询,扫描了多少条索引,可查看 system.profile 里的 keysExamined 字段,该值越大,CPU 开销越大。关键字:IXSCAN、keysExamined。

对于Mongodb数据库的慢请求分析与MongoDB CPU 利用率高分可参考:

《MongoDB CPU 利用率高,怎么破?》

在GitHub上创建Maven存储库

我们可以在github创建Maven存储库,这样可以在github托管java的依赖构件。如果有工程需要依赖,也可以通过maven方便的下载依赖。也许我们将Maven存储库托管在GitHub上有许多理由,包括许可问题、隐私和商业托管成本。无论您为什么选择托管基于GitHub的Maven存储库,设置一个存储库都很容易。具体设置步骤如下:

1.创建仓库

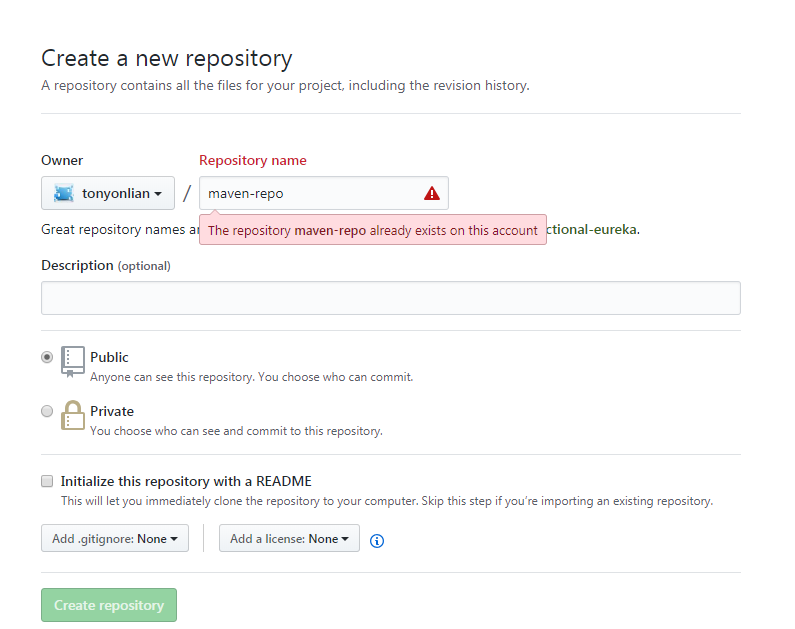
首先,在你的github上创建一个maven-repo,创建一个README.md,如清单1.1所示(不然后需mvn clean deploy 会报409错误)

清单1.1

JW2wJL.png

2.修改maven的setting.xml文件

1
2
3
4
5
<server>
<id>github</id>
<username>github登陆名</username>
<password>github登陆密码</password>
</server>

3.配置本地工程功的pom.xml文件

3.1设置一个从中提交文件的基本目录。

首先创建一个临时目录,并将它放在项目的 target 目录中,如清单3.1所示。对于本示例,我将该目录命名为 repo-stage。接下来,因为您想将此插件关联到 deploy 阶段,所以必须在 maven-deploy-plugin 的 中指定存储库位置,如清单 3.1 中的代码片段展示了如何指定存储库位置。

清单3.1

1
2
3
4
5
6
7
8
9
<plugin>
<groupId>org.apache.maven.plugins</groupId>
<artifactId>maven-compiler-plugin</artifactId>
<version>3.6.1</version>
<configuration>
<source>1.8</source>
<target>1.8</target>
</configuration>
</plugin>

3.2 配置site-maven-plugin并将它关联到 deploy 阶段。

请向该插件传递之前创建的 GitHub 服务器的 id,或者配置属性(github)。还需要向它传递存储库名称和所有者、您将项目工件提交到的分支,以及针对该提交的注释。您还需要关闭 Jekyll,让它不会认为自己需要生成 GitHub 页面。存储库名称是 dependency(如果该分支不存在,GitHub 将创建它)。配置如清单3.2

清单3.2

1
2
3
4
5
6
7
8
9
10
11
12
13
14
15
16
17
18
19
20
21
22
23
24
25
26
27
28
<plugin>
<groupId>com.github.github</groupId>
<artifactId>site-maven-plugin</artifactId>
<version>0.12</version>
<configuration>
<!-- Github settings -->
<!--<server>github</server>-->
<repositoryName>maven-repo</repositoryName>
<repositoryOwner>tonyonlian</repositoryOwner>
<!--dependency分支-->
<branch>refs/heads/dependency</branch>
<message>Artifacts for ${project.name}/${project.artifactId}/${project.version}</message>
<noJekyll>true</noJekyll>
<!-- Deployment values -->
<outputDirectory>${project.build.directory}/repo-stage</outputDirectory>
<includes>
<include>**/*</include>
</includes>
</configuration>
<executions>
<execution>
<phase>deploy</phase>
<goals>
<goal>site</goal>
</goals>
</execution>
</executions>
</plugin>

3.3 完整的build配置,如清单3.3

清单3.3

1
2
3
4
5
6
7
8
9
10
11
12
13
14
15
16
17
18
19
20
21
22
23
24
25
26
27
28
29
30
31
32
33
34
35
36
37
38
39
40
41
42
43
44
45
46
47
48
49
50
51
52
53
<build>
<plugins>
<plugin>
<groupId>org.apache.maven.plugins</groupId>
<artifactId>maven-compiler-plugin</artifactId>
<version>3.6.1</version>
<configuration>
<source>1.8</source>
<target>1.8</target>
</configuration>
</plugin>
<plugin>
<artifactId>maven-deploy-plugin</artifactId>
<version>2.8.2</version>
<configuration>
<altDeploymentRepository>
repo.stage::default::file://${project.build.directory}/repo-stage
</altDeploymentRepository>
</configuration>
</plugin>
<plugin>
<groupId>com.github.github</groupId>
<artifactId>site-maven-plugin</artifactId>
<version>0.12</version>
<configuration>
<!-- Github settings -->
<!--<server>github</server>-->
<repositoryName>maven-repo</repositoryName>
<repositoryOwner>tonyonlian</repositoryOwner>
<!--dependency分支-->
<branch>refs/heads/dependency</branch>
<message>Artifacts for ${project.name}/${project.artifactId}/${project.version}</message>
<noJekyll>true</noJekyll>
<!-- Deployment values -->
<outputDirectory>${project.build.directory}/repo-stage</outputDirectory>
<includes>
<include>**/*</include>
</includes>
</configuration>
<executions>
<execution>
<phase>deploy</phase>
<goals>
<goal>site</goal>
</goals>
</execution>
</executions>
</plugin>
</plugins>
</build>

4.执行部署命令

在项目根目录下执行部署命令,命令如4.1清单所示,执行结果如清单4.2 所示

清单4.1

1
mvn clean deploy

清单4.2

1
2
3
4
5
6
7
8
9
10
11
12
13
14
15
16
17
18
19
20
21
22
23
24
25
26
27
28
29
30
31
32
33
34
35
36
37
38
39
40
41
42
43
44
45
46
47
48
49
50
51
52
53
54
55
56
57
58
59
60
61
62
63
64
65
66
67
68
69
70
71
72
73
74
75
76
77
78
79
80
81
82
83
84
85
86
87
C:\Users\dongyl16339\Desktop\MavenSampler-github-maven-repo>mvn clean deploy
[INFO] Scanning for projects...
[INFO]
[INFO] ------------------------------------------------------------------------
[INFO] Building Maven Sampler 3.0
[INFO] ------------------------------------------------------------------------
[INFO]
[INFO] --- maven-clean-plugin:2.5:clean (default-clean) @ maven-repo-sampler ---
[INFO] Deleting C:\Users\dongyl16339\Desktop\MavenSampler-github-maven-repo\targ
et
[INFO]
[INFO] --- maven-resources-plugin:2.6:resources (default-resources) @ maven-repo
-sampler ---
[INFO] Using 'UTF-8' encoding to copy filtered resources.
[INFO] skip non existing resourceDirectory C:\Users\dongyl16339\Desktop\MavenSam
pler-github-maven-repo\src\main\resources
[INFO]
[INFO] --- maven-compiler-plugin:3.6.1:compile (default-compile) @ maven-repo-sa
mpler ---
[INFO] Changes detected - recompiling the module!
[INFO] Compiling 1 source file to C:\Users\dongyl16339\Desktop\MavenSampler-gith
ub-maven-repo\target\classes
[INFO]
[INFO] --- maven-resources-plugin:2.6:testResources (default-testResources) @ ma
ven-repo-sampler ---
[INFO] Using 'UTF-8' encoding to copy filtered resources.
[INFO] skip non existing resourceDirectory C:\Users\dongyl16339\Desktop\MavenSam
pler-github-maven-repo\src\test\resources
[INFO]
[INFO] --- maven-compiler-plugin:3.6.1:testCompile (default-testCompile) @ maven
-repo-sampler ---
[INFO] No sources to compile
[INFO]
[INFO] --- maven-surefire-plugin:2.12.4:test (default-test) @ maven-repo-sampler
---
[INFO] No tests to run.
[INFO]
[INFO] --- maven-jar-plugin:2.4:jar (default-jar) @ maven-repo-sampler ---
[INFO] Building jar: C:\Users\dongyl16339\Desktop\MavenSampler-github-maven-repo
\target\maven-repo-sampler-3.0.jar
[INFO]
[INFO] --- maven-install-plugin:2.4:install (default-install) @ maven-repo-sampl
er ---
[INFO] Installing C:\Users\dongyl16339\Desktop\MavenSampler-github-maven-repo\ta
rget\maven-repo-sampler-3.0.jar to D:\dev_repo\repository\com\tunyl\maven-repo-s
ampler\3.0\maven-repo-sampler-3.0.jar
[INFO] Installing C:\Users\dongyl16339\Desktop\MavenSampler-github-maven-repo\po
m.xml to D:\dev_repo\repository\com\tunyl\maven-repo-sampler\3.0\maven-repo-samp
ler-3.0.pom
[INFO]
[INFO] --- maven-deploy-plugin:2.8.2:deploy (default-deploy) @ maven-repo-sample
r ---
[INFO] Using alternate deployment repository repo.stage::default::file://C:\User
s\dongyl16339\Desktop\MavenSampler-github-maven-repo\target/repo-stage
Uploading: file://C:\Users\dongyl16339\Desktop\MavenSampler-github-maven-repo\ta
rget/repo-stage/com/tunyl/maven-repo-sampler/3.0/maven-repo-sampler-3.0.jar
Uploaded: file://C:\Users\dongyl16339\Desktop\MavenSampler-github-maven-repo\tar
get/repo-stage/com/tunyl/maven-repo-sampler/3.0/maven-repo-sampler-3.0.jar (3 KB
at 81.1 KB/sec)
Uploading: file://C:\Users\dongyl16339\Desktop\MavenSampler-github-maven-repo\ta
rget/repo-stage/com/tunyl/maven-repo-sampler/3.0/maven-repo-sampler-3.0.pom
Uploaded: file://C:\Users\dongyl16339\Desktop\MavenSampler-github-maven-repo\tar
get/repo-stage/com/tunyl/maven-repo-sampler/3.0/maven-repo-sampler-3.0.pom (3 KB
at 222.7 KB/sec)
Downloading: file://C:\Users\dongyl16339\Desktop\MavenSampler-github-maven-repo\
target/repo-stage/com/tunyl/maven-repo-sampler/maven-metadata.xml
Uploading: file://C:\Users\dongyl16339\Desktop\MavenSampler-github-maven-repo\ta
rget/repo-stage/com/tunyl/maven-repo-sampler/maven-metadata.xml
Uploaded: file://C:\Users\dongyl16339\Desktop\MavenSampler-github-maven-repo\tar
get/repo-stage/com/tunyl/maven-repo-sampler/maven-metadata.xml (303 B at 21.1 KB
/sec)
[INFO]
[INFO] --- site-maven-plugin:0.12:site (default) @ maven-repo-sampler ---
[INFO] Creating 9 blobs
[INFO] Creating tree with 10 blob entries
[INFO] Creating commit with SHA-1: e2b8c9c481a1e0830bf05559feb72ea650ee7f68
[INFO] Updating reference refs/heads/dependency from 5b8b548bc0ce3fdb11247d8f5b3
a506a2986a64d to e2b8c9c481a1e0830bf05559feb72ea650ee7f68
[INFO] ------------------------------------------------------------------------
[INFO] BUILD SUCCESS
[INFO] ------------------------------------------------------------------------
[INFO] Total time: 42.614 s
[INFO] Finished at: 2018-09-04T15:43:02+08:00
[INFO] Final Memory: 20M/172M
[INFO] ------------------------------------------------------------------------

5. 过程执行的问题

5.1.[ERROR] Failed to execute goal com.github.github:site-maven-plugin:0.12:site (de fault) on project maven-sampler: Error creating blob: Git Repository is empty. ( 409) -> [Help 1]

  • 解决方法:在github上创建的仓库里创建README.md文件。

5.2 [ERROR] Failed to execute goal com.github.github:site-maven-plugin:0.11:site (default) on project alta-maven-plugin: Error creating commit: Invalid request.
[ERROR]
[ERROR] nil is not a string.
[ERROR] nil is not a string. (422)
[ERROR] -> [Help 1]

  • 解决的方法:在github的个人设置中,设置好自己的姓名 。这个环节很重要,若不设置姓名,会出现一些一些意想不到的错误,

5.3 Error creating blob: Received fatal alert: protocol_version -> [Help 1]

  • 解决的方法:使用jdk1.8 或修改jdk1.7的协议版本为高版本

6 使用github仓库中的jar包

6.1 在需要依赖的工程的pom.xml中配置仓库,配置如清单6.1所示

清单6.1

1
2
3
4
5
6
7
8
9
10
11
12
<repositories>
<repository>
<id>maven-repo-github</id>
<!-- /用户名/仓库名/分支名/-->
<url>https://github.com/tonyonlian/maven-repo/dependency/</url>
<snapshots>
<enabled>true</enabled>
<updatePolicy>always</updatePolicy>
</snapshots>
</repository>
</repositories>

6.2 添加依赖。如清单6.2所示

清单6.2

1
2
3
4
5
<dependency>
<groupId>com.tunyl</groupId>
<artifactId>maven-repo-sampler</artifactId>
<version>1.0</version>
</dependency>

jetty-maven-plugin插件的使用

  1. 安装jetty插件
    打开项目的pom.xml文件,然后找到build节点,然后添加如下插件
    1
    2
    3
    4
    5
    <plugin>
    <groupId>org.mortbay.jetty</groupId>
    <artifactId>jetty-maven-plugin</artifactId>
    <version>8.1.16.v20140903</version>
    <plugin>

Read More

zookeeper客户端命令的使用

当安装了zookeeper服务器,想快速上手使用zookeeper,可以选用命令行客户端链接zookeeper服务器。通过命令行,可以快速使用zookeeper的相关功能,已达到快读体验的目的。

  1. 连接zookeeper服务器
1
2
3
4
5
6
7
8
9
$ bin/zkCli.sh -server 127.0.0.1:2181
//执行命令后的结果
Connecting to localhost:2181
log4j:WARN No appenders could be found for logger (org.apache.zookeeper.ZooKeeper).
log4j:WARN Please initialize the log4j system properly.
Welcome to ZooKeeper!
JLine support is enabled
[zkshell: 0]
  1. help命令
1
2
3
4
5
6
7
8
9
10
11
12
13
14
15
16
17
18
19
20
[zkshell: 0] help
ZooKeeper host:port cmd args
get path [watch]
ls path [watch]
set path data [version]
delquota [-n|-b] path
quit
printwatches on|off
createpath data acl
stat path [watch]
listquota path
history
setAcl path acl
getAcl path
sync path
redo cmdno
addauth scheme auth
delete path [version]
setquota -n|-b val path
  1. 查看节点目录
1
2
[zkshell: 8] ls /
[zookeeper]
  1. 创建节点 存入数据
1
2
[zkshell: 9] create /zk_test my_data
Created /zk_test

查看节点目录

1
2
[zkshell: 11] ls /
[zookeeper, zk_test]
  1. 获取节点目录数据
1
2
3
4
5
6
7
8
9
10
11
12
13
[zkshell: 12] get /zk_test
my_data
cZxid = 5
ctime = Fri Jun 05 13:57:06 PDT 2009
mZxid = 5
mtime = Fri Jun 05 13:57:06 PDT 2009
pZxid = 5
cversion = 0
dataVersion = 0
aclVersion = 0
ephemeralOwner = 0
dataLength = 7
numChildren = 0
  1. 更新节点目录数据
1
2
3
4
5
6
7
8
9
10
11
12
13
14
15
16
17
18
19
20
21
22
23
24
25
[zkshell: 14] set /zk_test junk
cZxid = 5
ctime = Fri Jun 05 13:57:06 PDT 2009
mZxid = 6
mtime = Fri Jun 05 14:01:52 PDT 2009
pZxid = 5
cversion = 0
dataVersion = 1
aclVersion = 0
ephemeralOwner = 0
dataLength = 4
numChildren = 0
[zkshell: 15] get /zk_test
junk
cZxid = 5
ctime = Fri Jun 05 13:57:06 PDT 2009
mZxid = 6
mtime = Fri Jun 05 14:01:52 PDT 2009
pZxid = 5
cversion = 0
dataVersion = 1
aclVersion = 0
ephemeralOwner = 0
dataLength = 4
numChildren = 0
  1. 删除节点目录
1
2
3
4
[zkshell: 16] delete /zk_test
[zkshell: 17] ls /
[zookeeper]
[zkshell: 18]

如何使用ab测试上传文件

1. 简单了解ab测试

ab是Apache超文本传输协议(HTTP)的性能测试工具。可以使用工具对网络接口进行压力测试,以判断网络接口的性能。

一般对网络接口进行压力测试,需要关注几个重要的指标,吞吐率,响应时间,并发数。通过这些指标的测试,可以反映出服务器的并发能力。

最常用的的工具有 ab 、siege、http_load等,本文主要说如何使用ab测试上传文件接口,在进入主题之前写大体了解下ab测试报告。

1
2
3
4
5
6
7
8
9
10
11
12
13
14
15
16
17
18
19
20
21
22
23
24
25
26
27
28
29
30
31
32
33
34
35
36
37
38
39
40
41
42
43
44
45
46
47
48
49
50
51
52
53
54
55
[root@iZ2325lrssqZ ~]# ab -n 1000 -c 10 http://localhost:8089/getAllApp
This is ApacheBench, Version 2.3 <$Revision: 655654 $>
Copyright 1996 Adam Twiss, Zeus Technology Ltd, http://www.zeustech.net/
Licensed to The Apache Software Foundation, http://www.apache.org/
Benchmarking 10.139.97.238 (be patient)
Completed 100 requests
Completed 200 requests
Completed 300 requests
Completed 400 requests
Completed 500 requests
Completed 600 requests
Completed 700 requests
Completed 800 requests
Completed 900 requests
Completed 1000 requests
Finished 1000 requests
Server Software:
Server Hostname: 10.139.97.238
Server Port: 8089
Document Path: /getAllApp
Document Length: 663124 bytes
Concurrency Level: 10
Time taken for tests: 115.019 seconds
Complete requests: 1000
Failed requests: 0
Write errors: 0
Total transferred: 663340000 bytes
HTML transferred: 663124000 bytes
Requests per second: 8.69 [#/sec] (mean)
Time per request: 1150.193 [ms] (mean)
Time per request: 115.019 [ms] (mean, across all concurrent requests)
Transfer rate: 5632.04 [Kbytes/sec] received
Connection Times (ms)
min mean[+/-sd] median max
Connect: 1 1 0.7 1 10
Processing: 371 1139 382.2 1093 2782
Waiting: 320 903 314.1 867 2249
Total: 372 1140 382.2 1095 2783
Percentage of the requests served within a certain time (ms)
50% 1095
66% 1242
75% 1360
80% 1427
90% 1690
95% 1863
98% 2107
99% 2255
100% 2783 (longest request)

Read More

验证模块joi介绍

  joi是nodej的一个工具模块,主要用于JavaScript对象的校验。它是一种简单易用的javacript对象约束描述语言,可以轻松解决nodejs开发中的各种参数的校验。

Read More